

Dashboard Overview
The dashboard is the first thing you see when you log in to KidzLog. It gives you a quick snapshot of your center's activity: how many children are enrolled, who's checked in, upcoming events, and any items that need your attention.
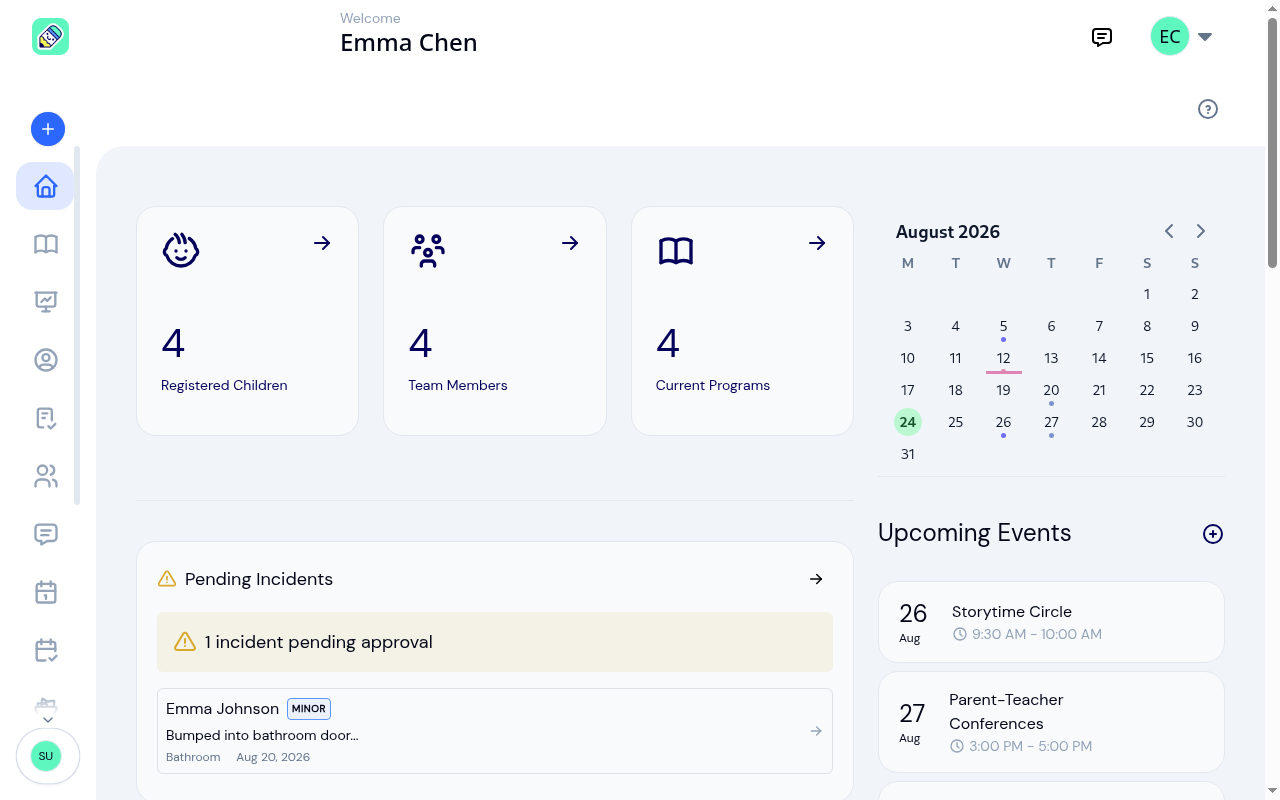
As your center grows, the dashboard shows more data — attendance stats, pending incidents, and real events:
Dashboard Sections
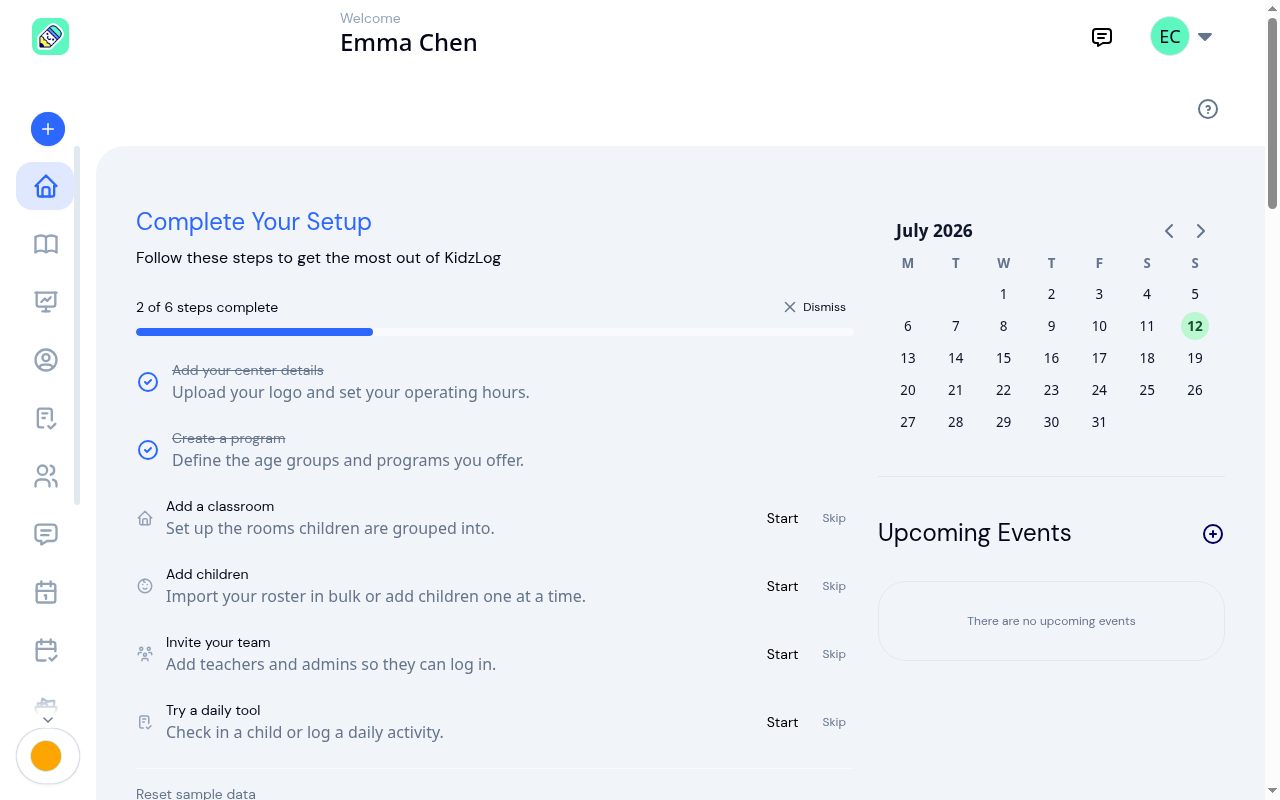
Complete Your Setup
For a newly created center, a Complete Your Setup checklist sits at the top of the dashboard. A progress bar shows how far along you are (for example, "2 of 6 steps complete"), and each step has a Start button that takes you straight to the right screen and a Skip option. Steps tick off on their own as you set things up, and the checklist disappears once everything is done.
If you dismiss it or want to return to it later, open the account menu in the top-right corner and choose Setup guide. Full details are in Creating Your Center.
Summary Cards
At the top of the dashboard, you'll see quick-glance cards showing:
- Registered Children — total number of children in your center
- Team Members — staff count
- Current Programs — active programs
Click any card to jump directly to that section.
Pending Incidents
If any incident reports are waiting for review, this panel opens with a count of everything still pending, then lists the three most recent reports underneath. The count covers every unapproved incident in your center, not just the three shown, so it keeps counting older reports that have been waiting a while.
Click a report to review it, or click the arrow in the corner to open the full Incidents list.
Menu Allergy Alert
If a menu running today contains a food that one of your children is allergic to, a Menu Allergy Alert panel appears with the number of children affected and the first few matches, each showing the child, the allergy, and the food item. Click View Allergy Report or the arrow to open the full report on the menu.
The panel only appears when there is something to report. On a day with no conflicts it stays hidden.
Attendance Widget
The attendance section shows today's numbers at a glance:
- Total Enrolled Children — children expected today
- Currently Here — children currently checked in
- Attended Today — children who have been checked in at some point today
- Absent — children who haven't checked in
Click the widget to go to the full Attendance page.
Staff-to-Child Ratios
Below attendance, the Staff-to-child ratios panel lists each of your active classrooms with the number of staff assigned to it and the number of children currently checked in. Rooms that need attention move to the top of the list, and a red number next to the title tells you how many rooms are over ratio or have no staff assigned. Archived rooms drop off the panel.
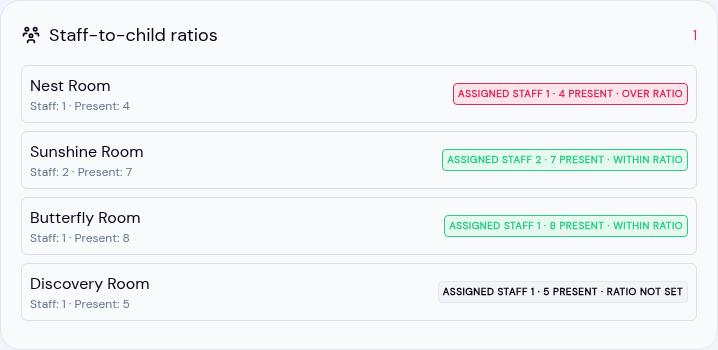
Each room shows a colored status:
- Within ratio (green) — there is enough assigned staff for the children currently present.
- Over ratio (red) — more children are present than the assigned staff can cover. This room is flagged at the top of the list.
- No staff assigned (red) — children are checked in but no staff member is assigned to the room.
- Ratio not set (gray) — you haven't set a children-per-staff limit for this room yet.
To make a room show a ratio status, set its limit and assign staff:
Set the children-per-staff limit
Open Classrooms, select the room, and edit it. In the Max children per staff field, enter the most children one staff member can supervise in that room. Rooms without this set stay on "Ratio not set".
Assign staff to the room
On the same classroom page, use Teachers → Assign Teacher to add the staff members who work in that room.
For more on setting up rooms, see Classrooms.
If your center doesn't track ratios, you can hide the panel: go to Settings → Classrooms and turn off Show the staff-to-child ratio panel. See Classroom Settings.
Payment
The Payment panel summarizes what your center has billed and collected: Revenue, Transactions, Pending, and Overdue. Use the Week, Month, Quarter, and Year buttons to change the period. Before any invoices have been paid, the figures read zero and a line underneath explains that paid invoices will appear here.
Calendar
The calendar on the right side highlights days with scheduled events. Click a date to see what's planned.
Upcoming Events
Below the calendar, you'll see a list of upcoming events. Click any event to view its details, or click View All to see the full Events list.
Sidebar Navigation
The sidebar on the left provides access to all sections of KidzLog. It shows as icons by default — hover over it to see the full labels.
Header
The header bar at the top includes:
- Welcome message with your name
- Messages icon — quick access to Messages
- Profile menu — click your avatar to access your profile, settings, and logout
How Lists Work
Every list in KidzLog behaves the same way, whether you're looking at children, invoices, announcements or activity history.

- 25 rows to a page. A list loads the first 25 records. The footer tells you exactly which ones you're looking at, and how many there are in total.
- Choose a bigger page. The Per page selector offers 25, 50 or 100 rows. Picking a larger size takes you back to the first page, since page 3 of 25 rows isn't page 3 of 100.
- The footer only appears when there's more than one page. A list of twelve children shows all twelve with nothing underneath.
- The address bar remembers where you are. Your page number and page size are part of the link, so copying it from your address bar and sending it to a colleague shows them the same view you were looking at. Opening a record and coming back returns you to the page you left, not to the first one.
- Filtering starts over. Typing in a search box, changing a filter or changing the sort always returns you to the first page, so a narrower list never looks empty just because you were deep into the old one.